
|
|
|
|
#1 |
|
Join Date: Aug 2009
Gametype: Capture the Flag Posts Rated Helpful 14 Times
|
Security System / Shutdown Style CTF tutorial
Shutdown Style CTF tutorial
I've decided to make a guide for creating shutdown/security maps for FF. I may be mistaken but I've never seen a similar guide made before. As it stands, creating a security system for an FF map is not very intuitive at all. In order to learn how to implement a security sytem I had to decompile ff_shutdown2, ff_destroy, and ff_phantom. It should be easier than that imo. I've seen a few people asking for help with making security systems for their maps so I thought I would make a thread for reference. I'll provide pictures, setp-by-step instructions, and an example map. Here goes! So once you have the brushwork done for your button and flag areas we can start adding the entities. 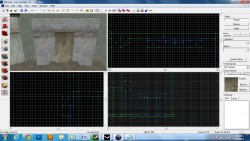 First we'll start with the button model. Select the entity tool and choose prop_dynamic_override. Go to the "world Model" field and click "Browse". In the "filter" field type "button" and select the props\ff_well\button.mdl Click OK and then click the "Collisions" field and select "Not Solid" (this will make it so players don't get hung up on the button) 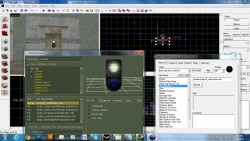 Next we will create a new brush that will be the button trigger. The actual button model itself does nothing but look nice. This method is similar to buttons on ff_destroy or ff_schtop, where the player simply runs into the button, no "+use" is necessary. The new button trigger brush will need to be completely covered in the "trigger" texture. I usually place the trigger brush in an area that makes sense relative to the button, the size of the brush is the area that the player must touch to deactivate the button. 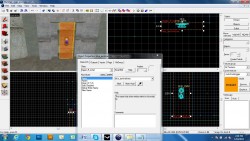 Once the brush is created, select it and hit ctrl+T to tie it to an entity. Select "trigger_ff_script" as the entity class and name it "blue_aardvarksec". Don't change any other fields. The next step is where it gets confusing, and this part is not very intuitive and seems kind of jerry-rigged to me but this is the method to use unless you're an LUA master. Create a small brush and cover it with the "nodraw" texture. This brush needs to be in a place where the player won't be able to run into it, you can even put it inside of another wall brush if you want. Select the brush and hit ctrl+T and tie it to entity class "func_door". 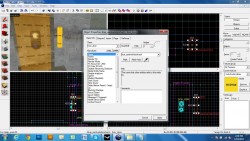 Name the func_door "blue_aardvarkdoorhack". Change the "Delay before reset" field to -1 Change the "lip" field to 0 And lastly, click the "Flags" tab and make sure nothing is checked off. We'll come back to this func_door in a minute. Next we are going to make the lasers. The lasers are actually env_beams, not env_lasers, and the lasers themselves do not actually do any damage. The damage is done by a special trigger_hurt. Lets make some laser coil props at first using a "prop_static". Select "World Model" and type "util" in the "Filter" field. Select "props_c17\utilityconnecter006.mdl" and hit OK. 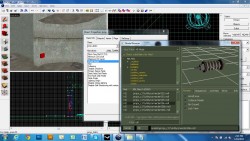 Set the "Collisions" to "Not Solid". 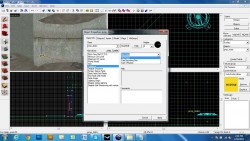 Orient the model so that half is inside the wall and half is sticking out, this will be the model prop for the origin of the laser beams, strictly aesthetic. 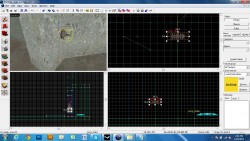 I made three evenly spaced props up along the wall on one side of the flag nook, and then copied them over to the other side so they all line up nicely. 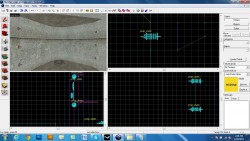 Next we are going to create six "info_target" entities that will be positioned on the ends of our laser props. In the name field of the first info_target type "blue_laser_p1".  Name the info_target directly accross from the first one "blue_laser_p2".  The info_targets will act as the points between which the env_beam will draw a laser beam. Repeat the steps for the rest of the info_targets but changing the names accordingly. "blue_laser_p3" should be across from "blue_laser_p4" "blue_laser_p5" should be across from "blue_laser_p6" 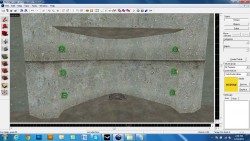 This will give us three laser beams straight across in front of our flag. Next we are going to create the env_beam entities. We will need three for this example. I like to place each env_beam alongside the wall next to the info_targets so that it's clear which env_beam belongs to which info_targets but that's not absolutely necessary. 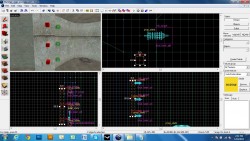 Select on the first env_beam and in the "name" field type "blue_lasers"  Select "Beam Color" and select a blue hue. 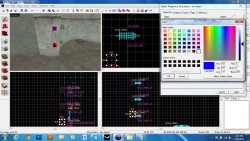 Select "Life" and type 0 Select "Damage / Second" and type 0 Select "Start Entity" and type "blue_laser_p1" 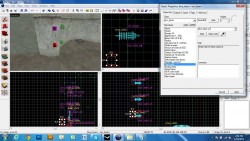 Select "Ending Entity" and type "blue_laser_p2" 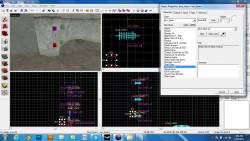 Click the "Flags" tab and make sure that "Start On" is checked off (or you won't see your laser in game) 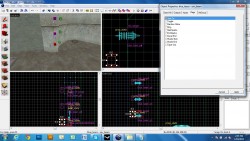 If you did it right, you should see a line that is purple or orange that connects between your info_targets (giving you a preview of the beam) 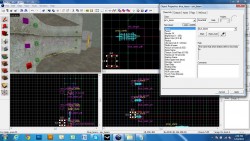 To make your life easier select the env_beam you just edited and click the "Copy" button under the class name in the Keyvalues: area. Now select the next env_beam to be edited and click the "Paste" button in the Keyvalues: field. This will copy all of the entities information and paste it into the next, saving you the trouble of picking the colors again, etc. 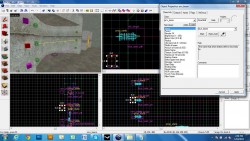 Now with the second env_beam selected, you need to make a few changes. Select "Start Entity" and type "blue_laser_p3" Select "Ending Entity" and type "blue_laser_p4" Click the "Flags" tab and make sure that "Start On" is checked off Repeat the copy and paste steps and copy over the info to the third and final env_beam. (Make sure all three env_beams have the same name "blue_lasers".) Select "Start Entity" and type "blue_laser_p5" Select "Ending Entity" and type "blue_laser_p6" Click the "Flags" tab and make sure that "Start On" is checked off 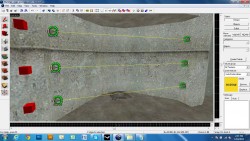 Now you have your laser beams! Next we need to create the trigger_hurt brush that will actually kill the enemy team. Create a brush that covers the entire outside of your flag nook.  Cover the entire brush in the "trigger" texture. Select the brush and hit ctrl+T and select the class "trigger_hurt" For the Name type: "sec_red_slayer" Select damage and type 1000 Now we are going to tie everything together. Go back and select your func_door brush that is named "blue_aardvarkdoorhack". Hit ctrl+enter to access it's properties/settings and click the "Outputs" tab. Under the outputs tab click "Add..." 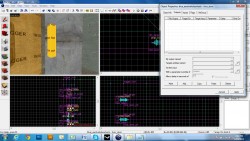 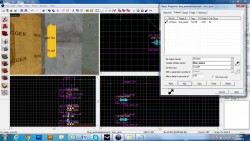 In the "Targets entities named" field type "blue_lasers" In the "Via this input" field select "TurnOff" In the "My output named" field select "OnOpen" (What this does is make it so when the func_door is activated and opens it will turn off the blue_lasers) You should see a circle with a diagonal arrow like pictured, if there is a red line through the symbol then there is a typo with the name somewhere, or you are trying to do something to the entity that's not appropriate) Click "Add..." again In the "Targets entities named" field type "blue_lasers" In the "Via this input" field select "TurnOn" In the "My output named" field select "OnClose"  Click "Add..." again In the "Targets entities named" field type "sec_red_slayer" In the "Via this input" field select "Disable" In the "My output named" field select "OnOpen"  Click "Add..." again In the "Targets entities named" field type "sec_red_slayer" In the "Via this input" field select "Enable" In the "My output named" field select "OnClose" 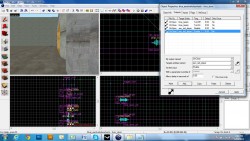 Now you're done with the blue team's security system. For the red team you just have to change all the entity names accordingly (from blue to red and red to blue, etc.) when you copy and flip the base. To get all of this to work ingame you need an LUA file that has the same name as your map. The best way to accomplish this is to open an existing LUA for a map with a similar gameplay type and hit "save as" and in the save as field type "yourmapname.LUA" Now you can edit the LUA file for your map. I've included an example LUA that is a copy of ff_aardvark's LUA. As long as you keep all of the entity names the same you won't have to mess with a thing in the LUA. Here is the minimum LUA code you'll need for your shutdown style CTF map (this all would go inside yourmapname.LUA file): Code:
-----------------------------------------------------------------------------
-- includes
-----------------------------------------------------------------------------

IncludeScript("base");
IncludeScript("base_ctf");
IncludeScript("base_location");


-----------------------------------------------------------------------------
-- aardvark security
-----------------------------------------------------------------------------
red_aardvarksec = trigger_ff_script:new()
blue_aardvarksec = trigger_ff_script:new()
bluesecstatus = 1
redsecstatus = 1

sec_iconx = 60
sec_icony = 30
sec_iconw = 16
sec_iconh = 16

function red_aardvarksec:ontouch( touch_entity )
	if IsPlayer( touch_entity ) then
		local player = CastToPlayer( touch_entity )
		if player:GetTeamId() == Team.kBlue then
			if redsecstatus == 1 then
				redsecstatus = 0
				AddSchedule("aardvarksecup10red",20,aardvarksecup10red)
				AddSchedule("aardvarksecupred",30,aardvarksecupred)
				OpenDoor("red_aardvarkdoorhack")
				BroadCastMessage("#FF_RED_SEC_30")
				--BroadCastSound( "otherteam.flagstolen")
				SpeakAll( "SD_REDDOWN" )
				RemoveHudItemFromAll( "red-sec-up" )
				AddHudIconToAll( "hud_secdown.vtf", "red-sec-down", sec_iconx, sec_icony, sec_iconw, sec_iconh, 3 )
			end
		end
	end
end

function blue_aardvarksec:ontouch( touch_entity )
	if IsPlayer( touch_entity ) then
		local player = CastToPlayer( touch_entity )
		if player:GetTeamId() == Team.kRed then
			if bluesecstatus == 1 then
				bluesecstatus = 0
				AddSchedule("aardvarksecup10blue",20,aardvarksecup10blue)
				AddSchedule("aardvarksecupblue",30,aardvarksecupblue)
				OpenDoor("blue_aardvarkdoorhack")
				BroadCastMessage("#FF_BLUE_SEC_30")
				--BroadCastSound( "otherteam.flagstolen")
				SpeakAll( "SD_BLUEDOWN" )
				RemoveHudItemFromAll( "blue-sec-up" )
				AddHudIconToAll( "hud_secdown.vtf", "blue-sec-down", sec_iconx, sec_icony, sec_iconw, sec_iconh, 2 )
			end
		end
	end
end

function aardvarksecupred()
	redsecstatus = 1
	CloseDoor("red_aardvarkdoorhack")
	BroadCastMessage("#FF_RED_SEC_ON")
	SpeakAll( "SD_REDUP" )
	RemoveHudItemFromAll( "red-sec-down" )
	AddHudIconToAll( "hud_secup_red.vtf", "red-sec-up", sec_iconx, sec_icony, sec_iconw, sec_iconh, 3 )
end

function aardvarksecupblue()
	bluesecstatus = 1
	CloseDoor("blue_aardvarkdoorhack")
	BroadCastMessage("#FF_BLUE_SEC_ON")
	SpeakAll( "SD_BLUEUP" )
	RemoveHudItemFromAll( "blue-sec-down" )
	AddHudIconToAll( "hud_secup_blue.vtf", "blue-sec-up", sec_iconx, sec_icony, sec_iconw, sec_iconh, 2 )
end

function aardvarksecup10red()
	BroadCastMessage("#FF_RED_SEC_10")
end

function aardvarksecup10blue()
	BroadCastMessage("#FF_BLUE_SEC_10")
end

-----------------------------------------------------------------------------
-- aardvark lasers and respawn shields
-----------------------------------------------------------------------------
KILL_KILL_KILL = trigger_ff_script:new({ team = Team.kUnassigned })
lasers_KILL_KILL_KILL = trigger_ff_script:new({ team = Team.kUnassigned })

function KILL_KILL_KILL:allowed( activator )
	local player = CastToPlayer( activator )
	if player then
		if player:GetTeamId() == self.team then
			return EVENT_ALLOWED
		end
	end
	return EVENT_DISALLOWED
end

function lasers_KILL_KILL_KILL:allowed( activator )
	local player = CastToPlayer( activator )
	if player then
		if player:GetTeamId() == self.team then
			if self.team == Team.kBlue then
				if redsecstatus == 1 then
					return EVENT_ALLOWED
				end
			end
			if self.team == Team.kRed then
				if bluesecstatus == 1 then
					return EVENT_ALLOWED
				end
			end
		end
	end
	return EVENT_DISALLOWED
end

blue_slayer = KILL_KILL_KILL:new({ team = Team.kBlue })
red_slayer = KILL_KILL_KILL:new({ team = Team.kRed })
sec_blue_slayer = lasers_KILL_KILL_KILL:new({ team = Team.kBlue })
sec_red_slayer = lasers_KILL_KILL_KILL:new({ team = Team.kRed })
Last edited by ian.de; 01-19-2013 at 10:49 PM. |
|
|

2 members found this post helpful. |
|
|
#2 |
|
Beta Tester
Join Date: Nov 2011
Gametype: Capture the Flag Posts Rated Helpful 293 Times
|
Wonderful, thanks alot Ian.
__________________
Currently equipped: Rad Scarf of liberating happiness. |
|
|

|
|
|
#3 |
|
Gets tickled by FF
Fortress Forever Staff
Join Date: Jun 2007
Location: UK
Class/Position: Med Solly HW Gametype: Any/CTF Posts Rated Helpful 41 Times
|
great job mate. Stickied
|
|
|

|
|
|
#4 |
|
Nade Whore
Server Owner
Beta Tester Join Date: Sep 2007
Location: Oklahoma
Class/Position: Scout/Soldier Gametype: CTF/TDM Affiliations: blunt. Moto Posts Rated Helpful 128 Times
|
This was of great help to me, thanks!
|
|
|

|
 |
| Currently Active Users Viewing This Thread: 1 (0 members and 1 guests) | |
|
|