Well. You clicked it, so here I go. This tutorial allows you to modify the color of your HUD, with your choice of colors. The
MAPNAME and
ROUND TIMER are
NOT affected by this.
EXAMPLES:
ORIGINAL
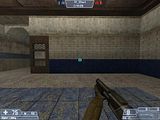 MOD
MOD
 Tools Needed:
 Lets see what you will need to modify your HUD colors:
-NOTEPAD (yes thats it

)
Step 1: Locate your ClientScheme.res and open it with Notepad. It should look something like this.
(should be located in "
C:\Program Files\Steam\SteamApps\SourceMods\FortressForever\ resource" )
*NOTE* This is just a small portion of the whole file. Your ClientScheme.res will be larger than this.
Code:
///////////////////////////////////////////////////////////
// Fortress Forever scheme resource file
//
// sections:
//        Colors            - All the colors used by the scheme
//        BaseSettings        - contains settings for app to use to draw controls
//        Fonts            - list of all the fonts used by app
//        Borders            - description of all the borders
//        CustomFontFiles        - defines fonts to be loaded which are not part of the system
//
// P.S. Advise you turn off wordwrap xP
///////////////////////////////////////////////////////////
Scheme
{
    /////////////////////////// COLORS ///////////////////////////
    Colors
    {
        /////////////// HUD Colours ///////////////
        "HUD_Tone_Bright"        "225 235 255 235"
        "HUD_Tone_Default"        "199 219 255 215"
        "HUD_Tone_Dim"            "199 219 255 120"

        "HUD_BG_Bright"            "109 124 142 185"
        "HUD_BG_Default"        "109 124 142 115"
        "HUD_BG_Dim"            "109 124 142 50"

        "HUD_Surface_Bright"        "82 92 104 210"
        "HUD_Surface_Default"        "75 85 95 200"
        "HUD_Surface_Dim"        "75 85 95 50"

        "HUD_Border_Bright"        "255 255 255 255"
        "HUD_Border_Default"        "245 245 245 230"
        "HUD_Border_Dim"        "245 245 245 50"

        "Hud_Status_Bright"        "255 255 255 255"
        "Hud_status_Default"        "109 124 142 200"
        "Hud_Status_Dim"        "109 124 142 100"

        "ArmorIncColor"            "255 220 0 255"
        "ArmorLowColor"            "255 0 0 255"
        "ArmorDmgColor"            "255 0 0 255"

        "HealthIncColor"        "255 220 0 255"
        "HealthIncAbove100Color"    "0 255 0 255"
        "HealthLowColor"        "255 0 0 255"
        "HealthDmgColor"        "255 0 0 255"

        /////////////// VGUI Colours ///////////////
        "UI_Tone_Default"        "199 219 255 255"
        "UI_Tone_Dim"            "109 124 142 115"
        "UI_Tone_Dark"            "75 85 95 115"

        "UI_BG_Highlight"        "225 235 255 45"
        "UI_BG_Dim"            "0 0 0 165"
        "UI_BG_Dark"            "0 0 0 90"

        //"UI_Slider_Text"        "127 140 127 255"
        "UI_Slider_Text"        "0 255 0 255"
        "UI_Slider_Nob"            "108 108 108 255"
        "UI_Slider_Track"        "31 31 31 255"
        "UI_Slider_DisabledText1"    "117 117 117 255"
        "UI_Slider_DisabledText2"    "30 30 30 255"

        /////////////// Team Colours ///////////////
        "BlueTeamColor"            "56 100 171 196"
        "RedTeamColor"            "188 0 0 196"
        "YellowTeamColor"        "202 173 33 196"
        "GreenTeamColor"        "68 144 65 196"

        /////////////// Misc. Colours ///////////////
        "Red"                "255 0 0 255"
        "Yellow"            "255 255 0 255"
        "Blue"                "0 255 0 255"
        "Cyan"                "0 255 255 255"
        "Green"                "0 255 0 255"
        "Magenta"            "255 0 255 255"

        "White"                "255 255 255 255"
        "Black"                "0 0 0 255"

        "Blank"                "0 0 0 0"

        "Normal"            "109 124 142 115"
        "Dark"                "50 50 50 180"
    }

    /////////////////////////// BASE SETTINGS ///////////////////////////
    BaseSettings
    {
        HudItem.Foreground        "HUD_Tone_Default"
        HudItem.Background        "HUD_BG_Default"

        "FgColor"                "HUD_Tone_Default"
        "BgColor"                "Blank"

        "Panel.FgColor"                "HUD_Tone_Default"
        "Panel.BgColor"                "Blank"

        "BrightFg"                "HUD_Tone_Bright"

        "DamagedBg"                "Blank"
        "DamagedFg"                "Red"
        "BrightDamagedFg"            "Red"

        "ZoomReticleColor"            "Green"

        /////////////// Weapon Selection Colours ///////////////
Step 2: Define your custom HUD Color Names.
I am going to use 2 different colors, and add them to the very top of the list. My first color will be the new
HUD Background Color, I will call it
HUD_CUSTOM_BG. My second color will be the new
HUD Trim and Font Color, I will call this one
HUD_CUSTOM_TRIM.
Step 3: Define your custom HUD Colors. This must be done in
RGBA color code. Which basically means
"RedColor GreenColor BlueColor AlphaColor(Transparency)"
Each color must be defined by a
NUMBER ,
0 - 255. Here is a link to a very nice RGB wiki article that gives plenty of color codes in [R G B] format.
RGB WIKI
Now
Alpha is simple. 0 will be Completely Invisible. 255 will be a Solid Color
I have decided that I will make my
HUD_CUSTOM_BG -
Black And my
HUD_CUSTOM_TRIM -
White
Code:
///////////////////////////////////////////////////////////
Scheme
{
    /////////////////////////// COLORS ///////////////////////////
    Colors
    {
                   ///////MY CUSTOM COLORS///////
        "HUD_CUSTOM_BG"          "0 0 0 115"
        "HUD_CUSTOM_TRIM"          "255 255 255 215"


                /////////////// HUD Colours ///////////////
        "HUD_Tone_Bright"        "225 235 255 235"
        "HUD_Tone_Default"        "199 219 255 215"
        "HUD_Tone_Dim"            "199 219 255 120"
Step 4: Apply your custom colors. Scroll down to the BASE SETTINGS section and replace the default color names with your Custom Hud Color Name.
Code:
/////////////////////////// BASE SETTINGS ///////////////////////////
	BaseSettings
	{
		HudItem.Foreground		"HUD_CUSTOM_TRIM"
		HudItem.Background		"HUD_CUSTOM_BG"

		"FgColor"				"HUD_CUSTOM_TRIM"
		"BgColor"				"Blank"

		"Panel.FgColor"				"HUD_CUSTOM_TRIM"
		"Panel.BgColor"				"Blank"

		"BrightFg"				"HUD_Tone_Bright"

		"DamagedBg"				"Blank"
		"DamagedFg"				"Red"
		"BrightDamagedFg"			"Red"

		"ZoomReticleColor"			"Green"
Step 5: Save and go check that shizzy out.
Here is an example of the finished product I walked you through.
BlackBG-WhiteTrimAndFont ClientScheme.res
And here is an original. Just in-case you decide to jack things up and need a new one.
 Default ClientScheme.res